Potatoes for the Home Garden

by A. Thompson, R.D. Davidson and R.T. Zink 1

Quick Facts...

  • Potatoes provide 13 essential vitamins and minerals.
  • Variety and tuber texture determine a potato's best use.
  • Allow about 15 pounds of seed potatoes (2.5 ounces each) for each 100 feet of row.
  • A 100 foot row can yield more than 200 pounds of potatoes.
  • High quality, certified seed gives the best results.
  • Maximum water use occurs during vine growth and early tuber bulking.
  • Store potatoes in a dark, humid place at 38 to 45 degrees F.

Potato production can be an enjoyable and rewarding experience for the home Gardener. Few vegetables yield more food per square foot than the potato.

The average potato provides 40 percent of the recommended daily allowance for vitamin C, has 3 grams of protein, is an excellent source of dietary fiber, and furnishes 12 other essential vitamins and minerals -- all with no fat.

Variety Selection

Potatoes add diversity, versatility and convenience to menus. They can be boiled, baked, fried and prepared several other ways. Skin color does not determine a potato's use, its texture does. Potatoes that are high in starch or dry matter are more mealy. They tend to bake up nicely and make good fries and chips. Those low in starch are more waxy and often higher in sugar. These varieties hold together better during boiling and are best used for salads, soups and similar dishes.

Select varieties that suit both your culinary needs and your local growing conditions. Many early varieties provide "new" potatoes in early to mid-July. Later maturing varieties take about 100 days from emergence to produce a crop with an acceptable yield.

Table 1 provides information on adaptability of common varieties suited to Colorado's diverse climate. Culinary uses, along with strengths and weaknesses of the varieties, also are summarized.

Seed

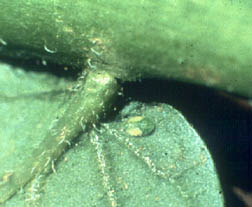
It is possible to grow potatoes from true botanical seeds set in small berries on many potato plants (Figure 1). This is not a good practice, however. Each seed is genetically unique. Therefore, seeds cannot be used reliably to produce a uniform Garden crop.

Most home Gardeners, instead, get better results from whole tubers or cut seed pieces. This practice is called vegetative propagation. Whole tubers used for seed should weigh 2 ounces or more for best results. If using cut seed (pieces cut from larger tubers), each piece should have 2 to 3 eyes and weigh about 2.5 ounces. Use a sharp, clean knife to cut whole tubers into seed. A 10 percent solution of regular household bleach (1 ounce bleach to 9 ounces of water) makes an excellent dip for sterilizing the knife between cuts.

Table 1: Popular potato varieties for the home Garden in Colorado.
Variety Description Maturity1 Use Comments
All Blue Long tuber type with blue-purple flesh color and dark blue-purple skin. High yielding. Medium to late Microwaving
Salad
Baking
Exotic.
All Red Oblong tuber type with light red flesh and skin color. Medium yielding. Medium Microwaving
Salad
Baking
Exotic.
Chipeta Round to oblong tuber type with white skin and creamy flesh. High yielding. Late Chipping
Baking
Developed in Colorado. Requires low fertility and water to produce very high yields.
Dark Red Norland Round tuber type with bright red skin. Medium yielding. Very early Boiling
Roasting
Salad
Popular Garden variety. Has some resistance to scab.
Kennebec Oblong tuber type with white skin. High yielding. Medium to late Chipping Occasional deep eyes can make peeling difficult. May become very large.
Norgold Russet Oblong tuber type with medium russet skin and shallow eyes. Medium yielding. Very early Baking Occasional hollow heart2.
Red LaSoda Oval shape with light red skin. High yielding. Late Boiling
Roasting
Salad
Wide adaptability. Deep eyes may make peeling difficult. Occasional growth cracks and hollow heart.
Russet Burbank Long tuber type with medium russet skin. Medium to high yielding. Late Baking
French fries
Stores well. Somewhat difficult to grow in the home Garden. Susceptible to stress-induced diseases and misshapen tubers.
Russet Norkotah Long tuber type with golden russet skin. Medium yielding. Very early Baking Very attractive appearance. Well suited to production in the San Luis Valley.
Russet Nugget Oblong to long tuber type with medium-heavy russet skin. Medium yielding. Late Baking
French fries
Developed in Colorado. Requires low fertility and water. Resistant to many diseases and quality disorders.
Sangre Round tuber type with dark red skin. High yielding. Medium Baking
Boiling
Salad
Developed in Colorado. May emerge erratically. Develops a slight net in some soils. Stores well and has excellent cooking quality.
Yellow Finn Oblong tuber type with white skin and yellow flesh. Medium yielding. Medium to late Salad Wide adaptability. An heirloom Garden variety.
Yukon Gold Oblong tuber shape with buff skin and yellow flesh. High yielding. Very early Baking
Mashing
Roasting
Attractive appearance and good flavor. Suitable for many culinary uses.
1Maturity in days from emergence (DAE): Early 65-85 DAE, Medium 85-100 DAE, Late more than 100 DAE.
2Hollow heart is a physiological condition resulting in a small lens-shaped area inside the tuber. This condition is triggered by erratic watering and high nitrogen fertility.

Plant cut seed immediately if soil conditions and temperature are ideal. Otherwise, heal them for 3 to 4 days in the dark at room temperature and high humidity. Do not expose cut seed to sun or allow it to dry out.

You need about 15 pounds of seed for each 100 feet of row. Obtaining seed potatoes often may be a problem for the home Gardener. Sources include local Garden centers and seed catalogs. Check with your local Colorado State University Cooperative Extension county office to be sure there are no restrictions on seed potatoes imported from out of state.

potato plant diagram
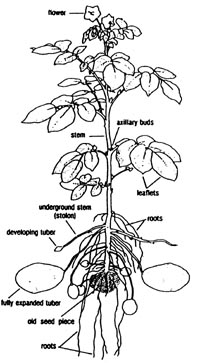
Figure 1: Diagram of a potato plant. (Adapted from Commercial Potato Production in North America, Potato Association of America, Orono, Me., 1980, 36 pp.)

Purchase only certified seed, as it has been inspected for disease and quality. Do not buy table stock potatoes in the produce section of your local grocery store. Most of them have been exposed to sprout inhibitors, which prevent the tubers from sprouting and forming a healthy plant. Do not save seed from the previous year -- it may be infected with seed-borne diseases.

When preparing seed for cutting or planting, warm it to 50 to 65 degrees to encourage germination and sprout growth. Tubers with sprouts 1/8 to 1/4 inch long are ideal. They should emerge rapidly under proper conditions. Do not wash seed tubers. This may increase disease susceptibility and disease spread between tubers.

Planting

Plant potatoes up to 2 weeks earlier than the average date of the last spring frost. The soil temperature should be 45 degrees or warmer. Potatoes prefer a sandy to sandy loam soil. Till the soil to a depth of 16 inches and pre-irrigate the soil until moist.

Commercial fertilizer may be used if desired. Place the fertilizer in a band about 6 to 7 inches deep and to the side of where the seed will lie in the bed. Do not put fertilizer in direct contact with the seed, as this may damage it. Potatoes use approximately 0.38 pounds of nitrogen for each 100 square feet of Garden space.

Use a complete fertilizer like 20-20-20; i.e., the fertilizer contains 20 percent nitrogen, 20 percent phosphorus and 20 percent potassium. For example, for a 100 square foot area, apply 1.9 pounds of fertilizer to achieve the proper fertilizer rate (0.38 lbs. N per 100 square feet / 0.20 N per pound of fertilizer = 1.9 pounds for a 100 square foot area). Levels of soil fertility and fertilizer needs are best obtained by soil sampling. See fact sheet 0.500, Soil Sampling, for information on how to take a soil sample.

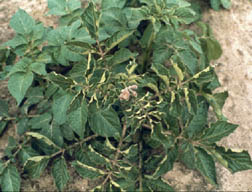
Some Gardeners find that applying half of the fertilizer at planting and the other half in late June works best. If plants appear to be yellowing at midseason, apply nitrogen to the sides of the hills or add it with the irrigation water. Be careful not to apply too much nitrogen. This may delay tuber development and decrease yield.

Some Gardeners prefer to use manure. If manure is applied, do it the year before planting potatoes. Make sure it is well aged to prevent burning and the possible introduction of diseases and weeds. Manure also promotes common scab on new tubers.

Plant potatoes in rows 30 to 36 inches apart. Space seed pieces within the row at 10 to 12 inches at a depth of about 4 inches. Hills may be formed at the time of planting or in the following four weeks. Hilling provides more space for the developing tubers to grow and helps prevent green potatoes.

It is a good idea to rotate spots in the Garden for potato production. Planting in the same area year after year may lead to disease and insect problems.

Growth stages
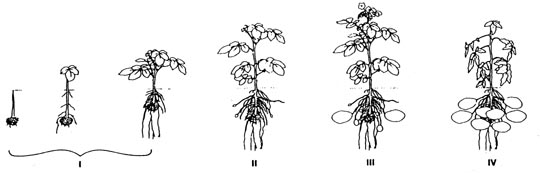
Figure 2: Growth stages of the potato plant. I: Vegetative Growth: sprouts emerge and form vegetative leaves. II: Tuber Initiation: tubers begin to form on stolons, foliage continues to develop. III: Tuber Growth: tuber enlargement. IV: Maturation: tuber skin thickens, vines begin to senesce. (Adapted from Integrated Pest Management for Potatoes in the Western United States, University of California, Division of Agriculture and Natural Resources Publication 3316, Oakland, CA, 1986, 146 pp.)

Irrigation

Keep soil moist but not wet. Potatoes require abundant oxygen and do not flourish in compacted soils. Generally, potatoes have a shallow root system. Most moisture is taken up from the top foot of soil. Be particularly careful to avoid overwatering during the first weeks after planting.

After plants have emerged, irrigate every three to five days, thoroughly wetting the soil to a depth of about 2 feet. Do not subject potato plants to water stress, as this will result in lower yield and misshapen tubers. Water stress is indicated by wilting and a dark gray-green hue to the foliage. Leaflets may roll slightly.

Maximum water use occurs during vine growth and early tuber development. To prevent the maturing tubers from being predisposed to rot organisms, reduce watering when vine death begins.

Pest Control

In the home Garden, weeds are most easily controlled by hoeing, pulling and light cultivation before the plants reach 8 to 10 inches tall. Avoid cultivation after this stage, as root damage may occur which will reduce yield. Weeds compete with potato plants for light, water and nutrients. After the plants reach 8 to 10 inches tall, they are better able to compete with the weeds.

The most common weeds in potatoes are red root pigweed, kochia, lambsquarter and nightshade. If thistle or quackgrass become a problem, consult your Colorado State Cooperative Extension county office or Garden supply store for information regarding the proper herbicide to apply.

Treat insect pests with insecticides or, for those preferring organic controls, with insecticidal soaps. Common Insects in Colorado home Gardens include aphids, flea beetles, psyllids and, in some areas, Colorado potato beetles.

Potato diseases may be seed-borne or acquired during the growing season. Many diseases can be avoided by using certified seed. Remove plants that are small, yellowing and sickly. Commonly encountered diseases in the Garden include scab, early blight, pink rot and black scurf.

Scab is caused by a bacterium. It is characterized by small, brown lesions on the tuber skin, seen at harvest. Scab development is enhanced by dry conditions and soils high in organic matter or recently amended with manure. Scab does not affect tuber quality, only appearance. Rotate the location of potatoes in the Garden to reduce the incidence of scab.

Early blight is characterized by small, target-shaped lesions on the foliage. Lesions begin on lower, mature leaves. It is caused by a fungus. Proper soil moisture and fertility levels can prevent or minimize its incidence, because stressed plants are more susceptible. A fungicide treatment every 14 days will help control this disease. Early blight tuber decay rarely occurs in home Gardens if tubers are harvested gently, vines are completely dead prior to harvest, and skins are adequately set.

Swollen, waterlogged tubers that may be partially or totally rotted are characteristic of pink rot. Proper water management late in the season is the best control for this fungal disease.

Black scurf on the tuber surface is frequently referred to as the "dirt that won't wash off." This fungal disease manifests itself on tubers if they lie in the soil for a long time after vine death. The best control is to plant seed that is free of black scurf.

Read and carefully follow all label directions when using pesticides.

Harvest and Storage

Potato plants mature and begin to die about 70 to 100 days after planting, depending upon variety. As plants mature, they use less water. To promote skin set, leave tubers in the ground for 10 to 21 days following vine death. This decreases bruising during harvest and permits better storage. Harvest when the soil temperature is 50 to 65 degrees.

"New potatoes," on the other hand, are harvested earlier, when vines are still lush and green. Skins of these small tubers are fragile and the tubers quickly dry out if they are not used immediately or refrigerated.

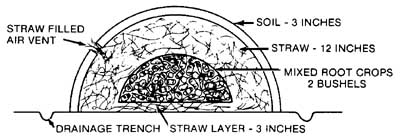
Store potatoes in a cool, dark and humid place. Air circulation through the pile of potatoes is desirable. Potato tubers are living, breathing vegetables. Storage sites are not potato "hospitals" but rather "hotels." Potato quality does not improve with storage.

Proper care at harvest can prevent many storage related problems. Cure the tubers at 50 to 60 degrees for two to three weeks, then cool to the desired storage temperature. Most Gardeners store their crop at 38 to 45 degrees and 90 percent or higher humidity. Do not allow condensation to form on tuber surfaces -- it may lead to rot problems.

Tubers stored in this manner will not sprout for approximately three months. Significant variation in either temperature (above 50 to 65 degrees or below 30 to 37 degrees) or humidity (below 75 percent) during storage will decrease potato quality and often result in earlier sprouting.

Do not store potatoes with fruit. Apples, for instance, give off a growth-regulating gas, ethylene, which promotes sprouting of potato tubers.

Do not eat green tubers. Instead, cut away green areas and discard. These areas contain glycoalkaloids, which impart a bitter taste and can give you a stomach ache.

Further Reading

To order these or other publications, contact your Colorado State Cooperative Extension county office or write to The Other Bookstore, 115 General Services Building, Colorado State University, Fort Collins, CO 80523-4061. You may also call (970) 491-6198 or send e-mail to E-mail: mailto:cerc@vines.colostate.edu

1A. Thompson, Colorado State University assistant professor; R.D. Davidson, associate professor; horticulture and landscape architecture; and R.T. Zink, Cooperative Extension potato specialist. 3/99. Reviewed 11/03.

Go to top of this page.

Updated Monday, August 23, 2004.


Soil Sampling

by J.R. Self and P.N. Soltanpour 1

Quick Facts...

  • A quality fertilizer recommendation depends on a quality soil sample.
  • A composite soil sample should represent a uniform field area.
  • Use a systematic sampling scheme, and a minimum of 15 subsamples throughout the field, regardless of acreage.
  • Sampling depth depends on the crop and the tillage depth.
  • Sample most fields every year for nitrate analyses.
  • Thoroughly air dry all soil samples within 12 hours after sampling.

Careful soil sampling is essential for an accurate fertilizer recommendation. A sample must reflect the overall or average fertility of a field so analyses, interpretations and recommendations accurately represent the nutrient or mineral status of the soil. An accurate evaluation will result in more efficient fertilizer use, which can increase yields, reduce costs and potentially reduce environmental pollution.

Consider each of the following before obtaining a soil sample:

  1. field area (acreage) per sample,
  2. sampling procedure,
  3. sample depth,
  4. when to sample,
  5. sampling tools,
  6. sample handling,
  7. information form, and
  8. handling and mailing.

Field Area

A composite soil sample should represent a uniform field area. Each area should have a similar crop and fertilizer history for at least the last two years. Soil characteristics (color, slope, texture, drainage and degree of erosion) should appear similar.

Exclude small areas within a field that are obviously different. These can be sampled separately if they are large enough to warrant special treatment. The field area represented by a single composite sample should represent no more than 40 irrigated acres or 100 dryland acres. Fewer acres is better.

Sampling Procedure

Use a systematic sampling scheme. Grid the area in your mind's eye (it is not necessary to measure it) and sample once within each grid. Obtain an accurate nutrient evaluation of a field site with 15 to 20 surface subsamples per 40 acres and six to eight subsurface cores. Mix these subsamples thoroughly and save one pint for analysis. This pint mixture is the composite soil sample.

In some cases, the number of subsamples may be limited by time constraints or availability of labor. Keep in mind, however, fewer subsamples result in less accuracy in evaluating the nutrient or mineral status of the soil.

Sampling Depth

Take the surface sample to tillage depth. For perennial pastures or hay Crops (cases where the soil is not annually mixed), sample to 4 inches deep. Be sure to separate and discard surface litter. Take deeper samples (subsoil) for nitrate-nitrogen (NO3-N) analysis where the nitrogen (N) fertilizer recommendation is of special importance. Sugarbeets are an excellent example: There is a delicate balance between yield response (too little N) and quality reduction (too much N).

Deep soil sampling greatly improves nitrogen recommendations for irrigated Crops. Take deep samples to 2 feet, preferably to 4 feet. There is little point in going deeper unless an unusual situation requires special attention.

Sample as follows: surface to tillage depth, tillage depth to 2 feet, and 2 feet to 4 feet. Keep each depth separate. Request a routine test for the surface composite sample and NO3-N only for the subsoil samples.

When to Sample

Sample fields before each cropping season. Fertility trends over a period of years provide important information, indicating the adequacy of a fertilizer program (too much, too little, about the correct amount).

The closer the samples are taken to planting time, the less chance there is for changes to occur. This usually is a problem only with N. However, soil samples may be taken either in the fall or spring. Fall sampling ensures the test results are ready in plenty of time for spring or for fall fertilization when weather usually is good and time not so critical.

Beware of situations that may cause soil values to change between sampling and planting. For example, heavy rainfall or pre-irrigation on sandy soils could leach NO3-N below the root zone of shallow-rooted Crops.

Tools

A stainless steel soil-sampling probe (moisture probe) is recommended for obtaining a soil sample. A shovel also is satisfactory for sampling, but it takes more time. Tools must be clean and free of rust. Collect the subsamples in a plastic or stainless steel container. DO NOT USE galvanized or brass equipment of any kind. It will contaminate the samples with important micronutrients.

Handling

Air-dry soil samples within 12 hours. Air drying samples prevents microbes from mineralizing soil organic matter that can cause less accurate N fertilizer recommendations.

Environmental Soil Sampling

Sampling for environmentally-related purposes may require special tools and different sampling procedures.

Larger diameter probes may be needed for rocky or sandy soils. Use plastic sleeves that line sample probes to prevent sample contamination or to keep cores intact for later analysis. Deeper subsoil sampling may be necessary to evaluate potential sources of minerals at reclamation sites. Wide-mouth one-liter plastic containers with screw caps can prevent moisture loss (if soil moisture needs to be evaluated) and provide enough soil for the tests required. Whether sampling for environmental or agricultural purposes, it is important to obtain a sufficient number of subsamples to adequately evaluate a site.

Information Form

Fill out the information form completely. Interpretations depend on a series of field and crop factors. Such items as past crop, manuring, crop to be grown and its yield goal, and irrigation, all enter into the final fertilizer recommendation. Without this information, a fertilizer recommendation cannot be tailored to the specific situation.

Handling and Mailing

Soil sample bags and information forms are available at Colorado State University Cooperative Extension county offices, fertilizer and agrichemical dealers, commercial soil testing laboratories, or from the Colorado State University Soil, Water and Plant Testing Laboratory, Room A319, Natural and Environmental Sciences Building, Colorado State University, Fort Collins, Colorado 80523; (970)491-5061. Mail samples directly to the laboratory of your choice for analysis.


1 J.R. Self, manager, Colorado State University Soil, Water and Plant Testing Laboratory; and P.N. Soltanpour, professor, soil and crop sciences. 6/97. Reviewed 2/03.

Go to top of Further Reading page.

Updated Monday, August 23, 2004.


Nonchemical Disease Control

by L.P. Pottorff 1

Quick Facts...

  • Many disease problems can be prevented or controlled without pesticides.
  • Always choose plants that are adapted to Colorado growing conditions.
  • Avoid bringing diseases into the Garden or moving them around within your Garden.
  • Eliminate the disease-causing organism after it has become established on a plant.

With the increasing concern about use and misuse of pesticides in commercial agriculture and home Gardens, there are more and more inquiries for organically grown commodities every year. Nonchemical control practices for plant diseases have been known and recommended for years. The backbone of any integrated pest control program must always include cultural and sanitation practices, two important components of nonchemical disease control.

Unfortunately, disease problems may begin as soon as seeds are planted and can continue into harvest and storage. Plant diseases may be caused by several pathogenic organisms, such as fungi, bacteria, viruses, mycoplasmas and nematodes. In addition, nonliving factors, such as deficiencies or excesses of water, light, temperature, air pollution, pesticides and nutrients, can either predispose a plant to disease or directly cause plant injury.

Fortunately, many disease problems can be prevented or controlled without pesticides. Effective plant disease control begins at the onset of disease or even before symptoms appear.

Resistance

Effective disease control through resistance (a plant's tolerance or immunity to a disease) is based on knowledge of the diseases that occur in an area. Always choose varieties of plants that are adapted to Colorado growing conditions. Many vegetable, fruit and ornamental plant varieties are available with resistance to one or more diseases.

For example, when purchasing tomato varieties, always select plants labeled "VFN," "VFNA," "VFNT," etc. This indicates that the plants are resistant to Verticillium wilt (V), Fusarium wilt (F), southern root-knot nematode (N), early blight (A), or tobacco (tomato) mosaic virus (T). Selecting resistant plants may eliminate many disease problems. Contact your Colorado State University Cooperative Extension county office for lists of plant varieties that are successfully grown in this area.

Exclusion

Exclusion is preventing the entrance and establishment of disease-causing organisms (pathogens) into areas where plants are grown. This means avoid bringing diseases into the Garden or moving them around within the Garden.

Use certified, disease-free seed or transplants. Examine the leaves and root systems of transplants and eliminate or destroy diseased plants. Either raise your own transplants in sterilized beds or buy them from a reputable dealer. Do not purchase transplants with galls or swellings on their roots or plants that have a brown discoloration on the stem at the ground line. Galls or swellings may indicate root-knot nematode infection. A brown stem discoloration may mean the presence of damping-off organisms.

Also, avoid transporting soil or tools from known disease areas to disease-free areas.

Eradication

Eradication is the elimination of the disease-causing organism after it has become established on a plant. Eradication can be accomplished by several methods.

Sanitation

Plant pathogens are less likely to survive if organic matter is quickly decomposed. Remove plant debris or infected plant parts after each growing season. Turn the soil after harvest to help break down small roots that may harbor nematodes, fungi or bacteria. Gardeners may compost dead plants if they have a good composting system; otherwise, these piles may serve as a source of pathogens.

Prune or remove twigs and branches of woody plants affected with fire blight and other bacterial or fungal canker diseases. (See fact sheet 2.907, Fire Blight.)

Keep Gardens weed free. Weeds often are another source of pathogens. Eradicate weeds to break the life cycle of pathogens and control them. Weed removal also can increase air movement and thus decrease conditions that favor disease development.

So pathogens do not spread from one area to another, always disinfest machinery and other tools with steam, hot water under pressure, or a 10 percent solution of household bleach and water.

Crop Rotation

Avoid planting the same crop in the same area of the Garden year after year. Continuous culture of the same kind of crop provides an opportunity for pathogen buildup.

For example, rotate leafy vegetables with grains or corn, or rotate annuals or biennials in seed and flower beds. It is best to grow the same or closely related plants in the same soil only once every three to five years. This practice starves out most pathogens that cause leaf, flower and stem diseases.

Crop rotation is not as effective against soil-borne organisms, those fungi, bacteria and nematodes that persist in the soil for up to 10 years or more.

Soil Sanitation Treatments

Occasionally, disease-causing organisms that live in the soil may build up and prevent satisfactory growth of plants. Pathogen-free soil is desirable for houseplants, transplants and Garden plots. Sterile potting mixes are available at many Garden centers. However, it may be desirable to sanitize small quantities of soil on your own.

There are several nonchemical methods available to eradicate or reduce pathogens in the soil. The use of dry, steam or solar heat are the most effective nonchemical means to sanitize soil. The time to treat soil is before seeding or transplanting. Soil to be treated must be easily crumbled and without clods or large pieces of plant debris. Add any amendments (manure, compost, peat moss, etc.) before treatment. Soil also must have proper moisture. To test for this, gently squeeze a handful of soil. When the hand is opened, the soil ball should break apart somewhat. If it doesn't and the ball cannot be broken apart by gently pushing down on top of the ball, the soil is too wet.

Oven sterilization. Place soil evenly but not more than 4 inches deep in nonplastic containers, such as seed flats, clay pots, and glass or metal baking pans. Tightly cover each container with aluminum foil. Insert a meat or candy thermometer through the foil into the center of the soil. Set the oven temperature between 180 and 200 degrees F.

Heat the soil to at least 180 degrees and allow it to remain at this temperature for 30 minutes. Do not allow the temperature to go above 200 degrees, because this may cause products that are toxic to plants. After heating, cool and remove containers from the oven. Leave the aluminum foil in place until you are ready to use the soil. The heated soil will give off an odor. Microwaves or outdoor cookers also can be used.

Pressure-cooker sterilization. Pour several cups of water into the cooker. Place no more than 4 inches of soil in shallow containers on a rack out of the water. Level the soil, but do not pack it down. Cover each container with aluminum foil. Stack the containers to allow steam circulation. Close the lid, but leave the steam valve open until all the air is forced out and steam begins to escape. Then close the steam valve and heat at 10 pounds pressure for 15 minutes. Turn off the heat, allow the containers to cool, and remove. Leave the aluminum foil in place until you are ready to use the soil.

Steam sterilization without pressure. Pour about 1 inch of water into the sterilizing container. Follow the soil preparation procedures listed earlier. Place filled soil containers on a rack that will hold them out of the water. Close the lid and bring the water to a boil. Open the lid just enough to prevent pressure from building up. When the steam begins to escape, continue boiling for 30 minutes. Turn off the heat and replace the lid. Remove the soil when cool.

Soil solarization. This method uses the sun's energy to heat small areas of soil to temperatures that are lethal to many soil-borne organisms and weed seeds. Treat during the summer when there are high air temperatures and intense solar radiation. With a tiller or a shovel, loosen the soil to be treated, wet it and cover it with a thin, clear, polyethylene (plastic) film. Seal the edges of the plastic sheet with soil to prevent heat loss and retain moisture. Leave the plastic in place for several weeks. The longer the soil is exposed to the heat generated by the solarization process, the greater the kill of undesirable organisms. For more information, contact your Colorado State Cooperative Extension county office.

Avoid toxicity from heated soil. With heavier soils and soils that contain a large amount of organic matter (manure, compost or peat moss), a toxic effect from heat sanitation may occur. This can cause poor seed germination, plant growth abnormalities or plant death. The toxicity is caused by an accumulation of ammonium compounds, soluble organic compounds, minerals or salts when the soil is heated too long or at too high a temperature. If soil toxicity is a problem, heavy irrigation of the treated soil may leach out many of these substances. Storing the soil two to three weeks without a cover also reduces soil toxicity.

Cultural Management

Cultural management involves avoiding the onset of disease. To accomplish this without pesticides, create an environment unfavorable to pathogens.

  • Don't work in the Garden when plants and soil are wet. Spores and cells of disease-causing organisms can spread from one plant to another and initiate new disease. Wet soils are easily compacted, which can decrease the amount of oxygen in the soil.
  • Make sure plants are spaced properly. Air movement decreases when plants are grown too close together. This allows moisture to remain on leaves for longer periods of time. Wider spacing in beds and landscape plantings promotes rapid drying after wet periods and stops development of foliage, flower and fruit pathogens.
  • Avoid excessive soil moisture. Overwatering enhances seed decay, damping-off and root rot diseases. Try not to plant in areas that have poor drainage or where water stands for several days following rains.
  • Fertilize plants properly based on soil nutrient analyses using either organic or commercially prepared (inorganic) fertilizers.

In other words, use good cultural management. Healthy plants are less likely to have disease problems than weak, undernourished ones. Grow plants under optimum conditions and there will be fewer disease problems.

Control of most plant diseases can be accomplished without pesticides. Use sound cultural practices, sanitation and well-adapted plant varieties to reduce disease problems. It is important to realize that you must accept some disease loss. Don't expect a perfect Garden or plant if you do not want to use chemicals.


1 Colorado State University Cooperative Extension plant pathologist and horticulturist, Integrated Pest Management Program, Jefferson County. 6/92. Reviewed 12/03.

Go to top of Further Reading page.

Updated Monday, August 23, 2004.


Potato or Tomato Psyllids

by W.S. Cranshaw 1


Quick Facts...

  • The potato/tomato psyllid secretes a toxic saliva during feeding that can severely damage potatoes and tomatoes.
  • Psyllids do not overwinter in Colorado. Outbreaks occur from flights of psyllids that migrate from southern states and Mexico.
  • Check potatoes and tomatoes each year for psyllid problems. If psyllids are detected, promptly treat affected plants with an insecticide.

Life Cycle

Potato/tomato psyllids pass through three life stages: egg, nymph (immature stage) and adult. The adult psyllid is about the size of a typical aphid and is a member of the insect family known as "jumping plant lice." Adult psyllids are rarely found in Gardens unless collected with a sweep net or knocked onto a cloth placed around the base of the plants. If seen, adult psyllids are striped with alternating dark and light bands (see Figure 1).

Figure 1: Tomato psyllid adult; tomato psyllid eggs on a leaf section; tomato psyllid nymph.

Eggs are small, 1/32 inch long. They are orange-yellow and supported by small stalks. They are much smaller than the stalked, white egg produced by lacewings, which also are common in Gardens. Psyllid eggs are frequently deposited along leaf margins but may occur on either leaf surface. Eggs hatch in six to 10 days.

Newly hatched nymphs are yellowish but become progressively greener as they develop, undergoing four molts. When almost mature, nymphs are nearly the same color as leaves. Nymphs are flat, elliptical and scale-like.

Nymphs are most numerous on the undersides of leaves but can occur on shaded upper leaf surfaces. They are inactive and seldom can be seen to move about. While feeding, psyllid nymphs excrete small, waxy beads of "psyllid sugar," which resembles granulated sugar. This material may cover leaves during heavy psyllid infestations. The nymph stage usually lasts from 14 to 22 days. Newly emerged adults remain green for a day or so before turning darker.

Figure 2: Psyllid nymphs feeding on potato leaf.

Potato/tomato psyllids do not overwinter in Colorado but survive on certain plants growing in southern Texas, New Mexico and Arizona. Problems with psyllids originate each season from winged, migrating forms of the insect. Psyllid outbreaks are irregular, depending on weather conditions.

Psyllids usually are found first on early potatoes or pepper transplants. Throughout the season, adult psyllids move to new plants, becoming most numerous late in the season on tomatoes. The number of psyllid generations produced during a year is thought to vary from four to seven. However, there is much overlap of the generations after the original infestations become established.

Figure 3: Psyllid feeding damage to potato plant.

Insect Injury

Adults and nymphs feed by sucking plant juices. Feeding by nymphs is especially serious because it brings about an abnormal condition known as "psyllid yellows," a result of toxic saliva injected by the insect. The symptoms on potato and tomato plants are generally similar. Usually the first abnormal condition is a slight discoloration (yellowing or purpling) along the midribs and the edges of the top leaves. The basal portions of these leaves tend to curl upward.

As the condition progresses, the entire plant top changes to yellowish-green or purple-red, and foliar growth is checked. The leaves remain small and narrow and tend to stand upright, giving the top of the plant a feathery appearance.

When the attack comes early in the development of the tomato plant, effects from psyllid feeding may be so severe that little or no fruit is set. Late attack on tomato plants is inclined to cause production of an abnormal number of fruits that never attain a desirable size or quality.

If the attack on potato plants occurs before tuber set, a likely result is the formation of numerous tubers on each stolon. An attack after tubers are partially developed usually results in greatly retarded growth and irregularly shaped potatoes. Potatoes from infested plants may sprout prematurely, even underground before harvest.

Psyllids also occur on other plants in the potato family, such as eggplant and pepper. Damage to these Crops is insignificant.

Control

Because these Insects are so small, damage to tomatoes or potatoes frequently occurs before the problem is detected. It is important to be able to identify potato/tomato psyllids so developing problems can be detected and treated in time. One of the most important means of identification is the psyllid sugar that is excreted by the insect and collects on leaves. Psyllid problems do not occur every season. In some areas of the state, Cooperative Extension pest alerts provide warnings of psyllid outbreaks.

Homeowners not able to properly identify psyllids may wish to routinely treat susceptible plants. Protectant treatments may be needed from when plants are 6 inches tall until midsummer. Well-established plants with abundant foliage usually can tolerate late season infestations with little yield loss.

Among insecticides available to homeowners, products containing permethrin or esfenvalerate are most effective when used at rates labelled for other potato/tomato insects. Alternately dusts of sulfur can provide control. Regardless, application must be thorough, covering the underside of lower leaves where the insects tend to concentrate. Insecticidal soaps (two percent concentration) may also be useful, although control is more erratic.

Some tomato varieties appear to be partially resistant to potato/tomato psyllids. Increased hairiness of the leaves is reported to make plants less favored by psyllids.

1Colorado State University Cooperative Extension entomologist and professor, bioagricultural sciences and pest management. 9/98. Reviewed 4/04.

Go to top of Further Reading page.

Updated Tuesday, August 24, 2004.


Storage of Home-Grown Vegetables

by J.E. Ells and C.J. Jorgensen1

Quick Facts...

  • Many home-grown vegetables lend themselves to storage.
  • Storing vegetables can be quicker, easier and more economical than canning, freezing or dehydrating.
  • Root Crops store best where they are grown until there is a danger of soil freezing.
  • Storage facilities can be constructed at little or no cost.

Storing vegetables produced in the home Garden can be easier, quicker and more economical than freezing, canning or dehydrating them. The storage facilities can be built at little or no cost. Stored vegetables can represent considerable savings in food dollars.

Harvesting

Root Crops store best where they are grown until there is a danger of soil freezing. Postpone harvesting by hilling the soil over the shoulders of carrots and beets to protect from freezing. If straw and soil are piled over the row as insulation, harvest may be delayed even longer. While in the row, the vegetables are readily accessible and the time and damage associated with harvesting and storage are circumvented. Dig the remaining roots before the soil freezes, top, clean, and put into storage.

Harvest onions soon after the tops fall over. Pull the onions, remove the tops, and cure the onions in mesh bags or crates where they have good air circulation until the necks dry down. When they rustle upon handling, they are ready to move to a cool, dry storage area.

Do not harvest winter squash and pumpkins until the vines are frost-killed and the skin is hard to the thumbnail. Leave stems on the fruit to protect against disease invasion.

Barrel storage
Figure 1: An outdoor barrel storage pit.

Parsnips will withstand freezing. Leave part of the crop in the ground and dig in the spring when the flavor is greatly improved.

Kale and collards can be left in the Garden long after the first fall frost. Harvest as needed until the foliage finally succumbs to cold weather. Wind protection will prolong its usefulness.

Celery and late cabbage may be harvested after the frost has stopped their growth. Pull celery with its roots attached. Cut cabbage and remove the loose outer leaves.

Storage

Root Crops, including potatoes, carrots, beets, turnips, rutabagas, winter radishes, kohlrabi and parsnips, adapt to home storage. This group stores best at near freezing with a high relative humidity. Store onions near freezing but with a low relative humidity to discourage neck rot. Leafy Crops such as celery and cabbage may also be stored. Store them by themselves -- they give off ethylene gas while in storage, which has proven detrimental to other vegetables.

Celery may be harvested and stored directly in trenches that are dug for that purpose. Pull the celery plants and pack them upright in the trench. Cover with paper, boards and soil. They will root, bleach, tenderize and develop a nutty flavor when removed in late December.

Pack cabbage upside down so the covering soil does not work into the heads.

Pumpkins and winter squash store longer at 50 to 60 degrees F and a low relative humidity.

Mound storage
Figure 2: A storage mound.

When selecting vegetables for storage, discard any unsound produce. This includes immature, damaged or diseased specimens. Also, when using vegetables from storage, check over the produce and discard any showing signs of rot. If allowed to remain, they will affect adjacent sound produce.

Outdoor Pit

This pit may be either lined or unlined. A lined pit is one that is sealed against ground water and rodents. This may be a barrel buried semi-horizontally in the ground (Figure 1). Place the roots in the barrel and put the lid loosely in place to allow for air transfer. Cover the barrel with straw held in place by a layer of soil. The straw may be 1 to 3 feet deep, depending upon the amount of cold that must be endured.

In the unlined pit, the roots are piled on a layer of straw and the pile is covered with straw held in place by a layer of soil. The unlined pit must be dug in an area where water will not fill the pit and where rodents are not a problem.

Storage Mound

A storage mound (see Figure 2) is similar to the unlined pit. It is used where groundwater is a problem or where only a short storage period under mild temperatures is anticipated. The vegetables are piled on a layer of straw on top of the ground. The mound then is covered with a layer of straw that is held in place by a layer of soil. The mound usually contains one or two bushels of mixed roots, so when the mounds are removed, all the produce can be taken into the house.

Basement storage
Figure 3: A basement storage area in the corner of a basement with a window. Walls are three sheets of 4 x 8-foot 3/8-inch plywood. Cut a 7-foot x 32-inch door in one sheet. Insulate the ceiling and interior walls. Build shelves and bins around all walls inside the storage area. Leave a small walkway near the door.

House Cellar

The root cellar under the house was the most popular means for storing vegetables before the days of central heating. However, acceptable storage can be constructed in a heated basement by partitioning off a storage room that includes a basement window (see Figure 3). Insulate the ceiling and walls of the room and open or close the window to provide the desired temperature. The temperature should be between 33 and 45 degrees. Add bins and shelves for efficient storage.

Root vegetables store best at high humidities, and onions, pumpkins and squash at lower humidities. Pack root Crops in bins with moist sand or vermiculite. These are preferable to organic materials because they don't decompose and are easier to handle than soil. Store dahlia roots and gladiolus corms dry in bins with perlite or vermiculite until spring.


1J.E. Ells, Colorado State University Cooperative Extension vegetable crop specialist and associate professor (retired); C.J. Jorgensen, former associate professor; horticulture and landscape architecture. Reviewed by D. Whiting, Extension consumer horticulture specialist, master gardener coordinator and resident instructor, department of horticulture and landscape architecture. 11/92. Reviewed 11/03.

Go to top of Further Reading page.

Updated Monday, August 23, 2004.


Planning the Vegetable Garden

by C.W. Basham 1

Quick Facts...

  • Plant only those vegetables your family likes.
  • F1 hybrids usually are more vigorous, productive and uniform than standard varieties.
  • To enjoy fresh vegetables over a long season, make an early spring planting and a summer planting for late harvest.

Common Garden Vegetables

Beans: The bush types are earlier, but pod set is more concentrated so they are productive over a shorter period than pole beans. Most bush beans have a bland flavor compared to the stronger characteristic flavor of the pole beans.

Cabbage: Early varieties usually produce smaller heads; late varieties larger. Smaller heads are good for cooking and for salads, larger heads for making kraut. Red leaf and savoy (crinkled leaf) varieties are available. Reds mature later.

Cauliflower: Most varieties require blanching (leaves drawn up and tied to protect the developing head from light). This is not required for purple varieties and some of the new white ones.

Carrots: For heavy soils (not sandy), the stump-rooted or half-long varieties may be more satisfactory than slender-rooted ones.

Cucumbers: Newer varieties and hybrids generally resist several diseases. Slicing and pickling varieties are listed separately, but most picklers make acceptable slicers when the fruits mature. The long, slender "burpless" hybrids are excellent for fresh use.

Lettuce: Leaf lettuce is high quality and the plants can be productive for a long period if you pick the leaves rather than cutting the plant. It also produces earlier than the crisp-head varieties. The butter-head varieties are a little earlier than crisp-head and of high quality.

Onion: It usually is not practical to direct-seed onion in home Gardens because it must be done in March. Plant sets for hard yellow storage onions and transplants for sweet Spanish types.

Peas: Edible podded peas are either flat-podded snow peas used primarily to stir fry, or round-podded sugar snap peas that are snapped and prepared like green beans. The edible-podded peas may be used fresh-cooked or frozen if the seed is bright green, or canned if the seed is light green.

Potato: Seed source is more important than variety. Use certified seed (tuber pieces) for assurance of freedom from disease.

Squash: Many productive summer squash hybrids are available. Winter squash varieties with bush rather than vine habit take less Garden space.

Sweet corn: The hybrids are uniform so all ears will reach edible maturity at about the same time. Plant several hybrids of differing maturity or use non-hybrid varieties for a longer harvest period. Some of the earliest varieties produce small ears with fewer rows of kernels.

Tomato: Hybrids are used almost exclusively in Gardens for vigor, productivity and disease resistance. Earliness is generally associated with smaller plant and fruit size. The smallest are satisfactory as container plants on the patio.

Special Considerations

Perennial vegetables to be located where they can occupy the same area for several years: Asparagus, rhubarb, horseradish.

Vegetables requiring relatively large amounts of space: Cucumber, muskmelon, potato, pumpkin, squash, sweet corn, sweet potato, tomato, watermelon.

Vegetables requiring a long, warm growing season; marginal or unsatisfactory at 5,000 feet elevation: Okra, muskmelon, sweet potato, watermelon.

Vegetables that may be unsatisfactory or require special attention at elevations above 5,000 feet: Cucumber, eggplant, pepper, pumpkin, squash, sweet corn, tomato.

Some vegetables that thrive in cool weather, particularly recommended for Gardens at high elevation: Beets, broccoli, cabbage, carrot, chinese cabbage, kale, kohlrabi, lettuce, peas, potato, radish, rutabaga, spinach, swiss chard, turnip, onion (green).

Some vegetables for summer planting and fall harvest: Beets, bush beans, celery, collards, escarole (endive), kale, kohlrabi, lettuce, radish, spinach, Swiss chard, turnip.

Vegetables for successive planting to prolong harvest period: Bush beans*, beets, cabbage*, lettuce, peas*, radish, spinach, sweet corn*. (*Varieties with different maturity dates may be planted at the same time to spread harvest interval.)

Vegetables for training on fences, trellises, or poles: Cucumber, peas, pole beans, tomato.

Some vegetables that can be stored for winter use: Beets, cabbage, carrot, celery, garlic, kohlrabi, onion, parsnip, potato, rutabaga, squash (winter).

Special fertility considerations: Cucumber, melons, squash, tomato. If possible, do not plant these vegetables where high applications of nitrogen fertilizers or manure have been made because fruiting may be delayed by excessive vegetative growth.

Vegetables for which F1 hybrid varieties are available for home Gardens: Broccoli, Brussels sprouts, cabbage, carrots, cauliflower, cucumber, eggplant, muskmelon, onion, pepper, squash (summer), sweet corn, tomato, watermelon. An F1 hybrid is the first generation result of a cross between two inbred parents. They usually are more vigorous, uniform and productive than other varieties.

Vegetables for which transplants are commonly used: Broccoli, Brussels sprouts, cabbage, cauliflower, celery, eggplant, onion, pepper, sweet potato, tomato. If starting transplants, plant them indoors six to eight weeks before transplanting time. Onion plants or sets are best purchased.

Table 1: Representative dates of last frost in Colorado.
Location Date
Boulder May 3
Burlington May 4
Denver April 26
Durango May 28
Fort Collins May 7
Glenwood Springs May 24
Grand Junction April 16
Hayden June 10
Leadville June 17
Montrose May 10
Pueblo April 23
Rocky Ford April 28
Saguache May 30
Trinidad May 2

 
Table 2: Approximate amount to plant per person. (Experience will allow personal adjustments):
6 ft. row: Beans, beets, carrots, kale, lettuce, mustard, onion, Swiss chard, turnip
12 ft. row: Peas
25 ft. row: Potato, sweet corn
6 plants: Broccoli, peppers
2-4 plants: Cabbage, cauliflower, cucumber, melons, squash, tomato

 
Table 3: Spring planting succession.
About 4 weeks before date of average last frost: Broccoli, cabbage, lettuce, onions, peas, potato, radish, spinach, turnip.
About 2 weeks before date of average last frost: Beets, carrot, mustard, parsnip, Swiss chard, sweet corn.
2 or more weeks after date of average last frost: Eggplant (t), pepper (t), sweet potato, beans, tomato (t), squash, cucumber, melons.
(t) = transplant

1Colorado State University professor, horticulture and landscape architecture. 12/96.

Go to top of Further Reading page.

Updated Monday, August 23, 2004.


Fertilizing the Vegetable Garden

by F.D. Moore1

Quick Facts...

  • Soils that grow weeds should produce good Gardens.
  • Low analysis fertilizers, 10 to 20 pounds per 1,000 square feet, may be added to Gardens each year, assuming low soil salt levels.
  • Well-aged horse or cow manure may be incorporated into soil in the fall at rates of up to 900 pounds per 1,000 square feet.
  • Do not use fresh manure in food Gardens.
  • Don't use lawn clippings containing pesticides on vegetables or in composting.

A soil that will grow a good crop of weeds, other than alkali or salt weeds, can be made into a fine Garden. The soil must have good subdrainage. A heavy clay soil is not a good choice. Select level land or land that gently slopes to the south or southeast. Full sunlight exposure is desired.

Relatively high levels of soil nutrients are necessary for successful vegetable production. Maintain the nutrient level by adding mineral fertilizers, organic materials or both. A soil test will determine which nutrients to add, and also warn of excess levels of nutrients and salts that may harm plants.

Mineral Fertilizers

All commercial fertilizers are labeled uniformly. There are three figures. The first is the percentage of elemental nitrogen (N), the second is available phosphate (P2O5), and the third is water-soluble potash (K2O). For example, 50 pounds of (5-10-5) fertilizer contains 2.5 pounds of nitrogen, 5 pounds of phosphate, and 2.5 pounds of potash.

As a rule, 10 to 20 pounds of low-analysis complete mineral fertilizer (5-10-5, 6-10-4, etc.), may be added to 1,000 square feet of Garden area each year. Most Colorado soils do not require potash. If high-analysis fertilizers are used on a potash-sufficient soil, apply 10 pounds of superphosphate [0-(16 to 20)-0] or 5 pounds of treble superphosphate [0-(42 to 47)-0] or 5 pounds of ammonium phosphate (11-48-9) per 1,000 square feet.

Supply nitrogen by working well-aged manure in with the phosphate fertilizers. Never use fresh manure in food Gardens! Urea, ammonium sulfate or ammonium nitrate may be used at rates to give 1 pound of nitrogen per 1,000 square feet. Work mineral fertilizers into the soil in the fall or spring. Phosphate and potash do not need to be applied after planting. Post-planting applications of nitrogen on fruit-bearing Crops, such as tomatoes and strawberries, may stimulate vegetative growth and reduce yield. Starter solutions high in phosphate may be used to advantage when setting transplants.

Organic Fertilizers

When organic materials are available, work them deeply into the soil in the fall of the year. Use aged horse and cow manure at rates of up to 900 pounds per 1,000 square feet. Use no more than one-fourth of this amount of aged sheep, rabbit or poultry manure. The nutrient quality of barnyard manure and compost can be improved by adding 1/4 pound of superphosphate to each bushel of material. The average farm manure as drawn to the field contains about 10 pounds each of nitrogen and potash as well as 5 pounds of phosphate per ton.

Fresh sawdust or sawmill woodwaste may be used as a soil amendment in order to improve the tilth of most Colorado soils. However, composted organic materials are better. If undecomposed materials are used, such as those found in Table 3, follow the appropriate nitrogen recommendations in the table.

Do not use lawn clippings containing pesticides on vegetables or for composting. Lawn fertilizers may contain herbicides. Therefore, do not use them on vegetable Gardens.

References

  • Selecting Fertilizers for Lawns and Gardens, Home and Garden Bulletin No. 89, Soil and Water Conservation Research Division, Agricultural Research Service, USDA.
  • Composting Yard Waste., Colorado State University Cooperative Extension, fact sheet 7.212.
  • Zinc Deficiency of Field and Vegetable Crops in the West, USDA Leaflet No. 495.
  • Organic Gardening, Colorado State University Cooperative Extension, Bulletin 486A.
  • Salt-Affected Soils, Colorado State University Cooperative Extension, fact sheet 0.503.

Table 1: Example of fertilizers for vegetable Garden soils that require potash.
Previous fertilizer-applied nutrients Fertilizer to apply Approximate amount of
Analysis Rate N P2O5 K2O
lb/1,000 sq ft
Little or none 3-13-13 40 lbs 1.2 lbs 4.8 lbs 4.8 lbs
Some 5-10-10 25 lbs 1.2 lbs 2.5 lbs 2.5 lbs
Heavy 10-10-10 12 lbs 1.2 lbs 1.2 lbs 1.2 lbs

Table 2: Approximate composition of organic fertilizers.*
Fertilizer Percent composition
N P2O5 K2O
Cow manure 0.5-2.0 0.2-0.9 0.5-1.5
Horse manure 0.5-2.5 0.3-2.5 0.5-3.0
Sheep manure 1.0-4.0 1.0-2.5 1.0-3.0
Rabbit manure, dry 2.3 1.4 0.8
Poultry manure 1.1-6.0 0.5-4.0 0.5-3.0
Dried blood 12.0-14.5 0.4-1.5 0.6
Hog manure 0.3-0.5 0.2-0.4 0.4-0.5
Activated heat-treated sludge 2.0-6.0 3.0-7.0 0 -1.0
*Actual percent composition depends upon moisture content, bedding and/or litter materials.

Table 3: Amount of nitrogen (N) required for decomposition of organic materials.
Material Amount of N required lbs N/ton of organic matter
Corn cobs, ground 22.5 lbs
Hay 7.6 lbs
Sawdust, fresh 26.0 lbs
Cereal straw 17.6 lbs
Grass clippings 4.0 lbs

Table 4: Amounts of fertilizer required to supply the nitrogen (N) needed to decompose fresh sawdust.*
Fertilizer Amount needed to decompose 1 bushel of sawdust
lbs
Urea (45.0% N) 0.8
Ammonium nitrate (33.5% N) 0.8
Ammonium sulfate (21.0% N) 1.2
10-10-10 or 10-6-4 (10.0% N) 2.7
6-10-4 (6.0% N) 5.0
*Incorporate not more than 2 inches of sawdust, 6 to 8 inches deep, per year. Do not use black walnut or cedar sawdust.

1Colorado State University professor, horticulture. 11/99.

Go to top of Further Reading page.

Updated Monday, August 23, 2004.